Cradlepoint deployment
Deploying a QoS-agent in a Cradlepoint 5G modem Router
Prerequisites:
- 5G Modem Router with Container support such as: E3000, E300, R1900, R2100
You will also be able to use a configuration file that collects GPS data and sends it to the Latency Heatmap section of your analyzer. This will only work if your cradlepoint modem supports and has the GPS functionality turned ON.
To enable the GPS option:
- Click DEVICES in the left-side navigation panel.
- Select the device from the Devices page.
- Click Configuration and Edit.
- Click SYSTEM and GPS in the Edit Configuration window.
- Check the Enable GPS option
Deploy the Agent
Complete the following steps to deploy a QoS-agent on a local device.
- Log into NetCloud Manager.
- Click DEVICES in the left-side navigation panel.
- Select the device from the Devices page.
- Click Configuration and Edit.

- Click SYSTEM in the Edit Configuration window.
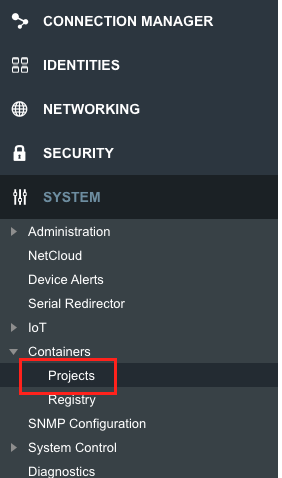
- Click Containers then Projects.

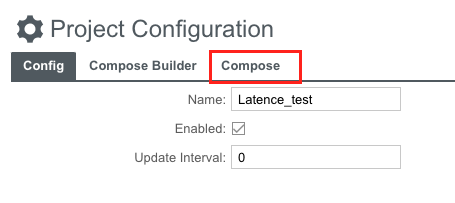
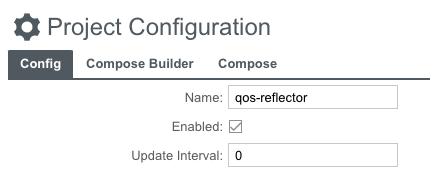
- Click Add to open the Project Configuration window, and enter a name for the project.
- Click the Enabled checkbox.
- Go into the "Compose" tab.
To deploy a normal agent
You can now paste this slightly modified version of the YAML config file from the docs and modify it with your License, QoS-agent ID and reflector IP:
version: '2.4'
services:
  qos-agent:
    image: registry.latence.ca/software/qos-agent:latest
    container_name: lti_qos-agent
    network_mode: bridge
    restart: unless-stopped
    cap_add:
      - NET_ADMIN
    logging:
      driver: json-file
    extra_hosts:
      - msgbus.latence.ca:REPLACE_BY_IP_OF_ANALYZER_HOST
    environment:
      - LTI_agent_id=REPLACE_BY_DESIRED_ID
      - LTI_license_key=REPLACE_BY_LICENSE_KEY
      - LTI_reflector=REPLACE_BY_IP_OF_REFLECTOR_HOST

      - LTI_agent_name=RELACE_BY_AGENT_NAME
      - LTI_agent_hardware=REPLACE_BY_HARDWARE_NAME
      - LTI_agent_net_type=REPLACE_BY_NETWORK_TYPE
      - LTI_agent_net_name=REPLACE_BY_NETWORK_NAME
      - LTI_agent_address=REPLACE_BY_AGENT_ADDRESS
      - LTI_agent_gps_pos=REPLACE_BY_AGENT_GEOLOCATION
      - LTI_agent_details=REPLACE_BY_AGENT_DETAILS
      - LTI_agent_expected_application_latency=REPLACE_BY_EXPECTED_APPLICATION_LATENCY
      - LTI_agent_expected_stability=REPLACE_BY_EXPECTED_STABILITY
To deploy an agent with GPS data collection
You can paste this customized version of the YAML config file with 3 components:
- The GPS data gathering container
- The regular agent
- A second agent used to measure UDP bandwidth
The analyzer and Agent ID have to be the same for all the containers in the file.
version: '3'
services:
  geoloc-cradlepoint:
    image: registry.latence.ca/software/geoloc-cradlepoint:latest
    volumes:
      - $CONFIG_STORE
    logging:
      driver: json-file
    environment:
      - LTI_analyzer_port=12086
      - LTI_analyzer_ip=REPLACE_BY_IP_OF_ANALYZER_HOST
      - INTERVAL_S=5.0
      - LTI_agent_id=REPLACE_BY_DESIRED_ID

  qos-agent:
    image: registry.latence.ca/software/qos-agent:latest
    container_name: lti_qos-agent-tcp
    network_mode: bridge
    restart: unless-stopped
    cap_add:
      - NET_ADMIN
    logging:
      driver: json-file
    extra_hosts:
      - msgbus.latence.ca:REPLACE_BY_IP_OF_ANALYZER_HOST  # Same as above
    environment:
      - LTI_agent_id=REPLACE_BY_DESIRED_ID                # Same as above
      - LTI_license_key=REPLACE_BY_LICENSE_KEY
      - LTI_reflector=REPLACE_BY_IP_OF_REFLECTOR_HOST
      - LTI_iperf3_session_interval=7200

      - LTI_agent_name=RELACE_BY_AGENT_NAME
      - LTI_agent_hardware=REPLACE_BY_HARDWARE_NAME
      - LTI_agent_net_type=REPLACE_BY_NETWORK_TYPE
      - LTI_agent_net_name=REPLACE_BY_NETWORK_NAME
      - LTI_agent_address=REPLACE_BY_AGENT_ADDRESS
      - LTI_agent_gps_pos=REPLACE_BY_AGENT_GEOLOCATION
      - LTI_agent_details=REPLACE_BY_AGENT_DETAILS
      - LTI_agent_expected_application_latency=REPLACE_BY_EXPECTED_APPLICATION_LATENCY
      - LTI_agent_expected_stability=REPLACE_BY_EXPECTED_STABILITY

    # To get both UDP and TCP bandwidth merasurements, you will need a second agent
    # with the same agent ID but with iperf3 udp setttings turned on

  qos-agent-udp:
    image: registry.latence.ca/software/qos-agent:latest
    container_name: lti_qos-agent-udp
    network_mode: bridge
    restart: unless-stopped
    cap_add:
      - NET_ADMIN
    logging:
      driver: json-file
    extra_hosts:
      - msgbus.latence.ca:REPLACE_BY_IP_OF_ANALYZER_HOST  # Same as above
    environment:
      - LTI_agent_id=REPLACE_BY_DESIRED_ID                # Same as above
      - LTI_license_key=REPLACE_BY_LICENSE_KEY            # Same as above
      - LTI_reflector=REPLACE_BY_IP_OF_REFLECTOR_HOST     # Same as above

    # To get the udp bandwidth measurements, deactivate all the protocols
    # by writing "-1" as value, only leave iperf and set the last variable as "true"
      - LTI_iperf3_session_interval=7200
      - LTI_traceroute_interval=-1
      - LTI_http_interval=-1
      - LTI_https_interval=-1
      - LTI_udp_interval=-1
      - LTI_icmp_interval=-1
      - LTI_twamp_session_interval=-1
      - LTI_iperf3_udp=true
For metadata configuration, please refer to this Qos-Agent section, of the launching documentation.
- You can now hit Save and Commit Changes.
Verifying the Agent is deployed
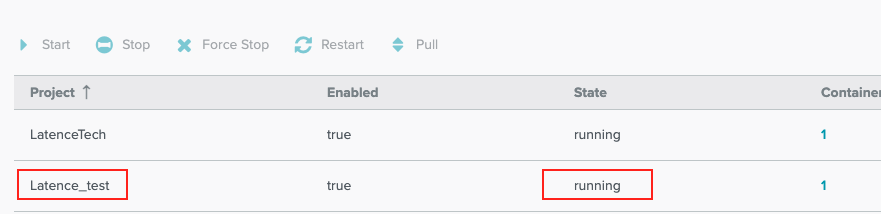
Complete the following steps to verify that the QoS-agent container has downloaded and is up and running.
- Click on the device where you installed the docker.
- Click the Containers tab.

- Check that the container state is "running" under Projects.
- If the container doesn't show the running state, give it a few seconds and refresh the page.
- Sometimes it may take a few minutes for the router to actualize, go to your analyzer and see if your agent has been deployed.
The compute consomption of 1 Agent (Standard Configuration) on a Cradlepoint E3000 router: - Average CPU ~1% - Average Memory 8MB
Deploying a Reflector in a Cradlepoint 5G modem Router
Prerequisites:
- 5G Modem Router with Container support such as: E3000, E300, R1900, R2100
- This configuration works if the QoS-agent and the Reflector and in the same network, e.g. private wireless network
Deploy the Reflector
Complete the following steps to deploy a reflector on a local device.
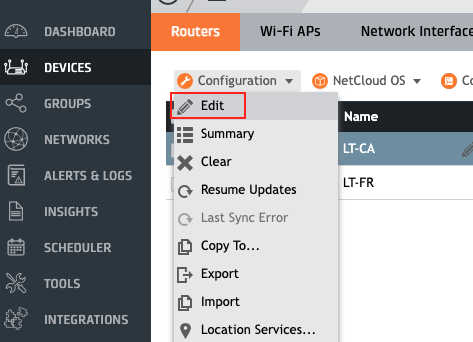
- Log into NetCloud Manager as admin or full user privileges.
- Click DEVICES in the left-side navigation panel.
- Select the device from the Devices page.
- Click Configuration and Edit.
- Select the Local IP Networks in the NETWORKING section
- Take note of the IP address of the Primary LAN subnet.
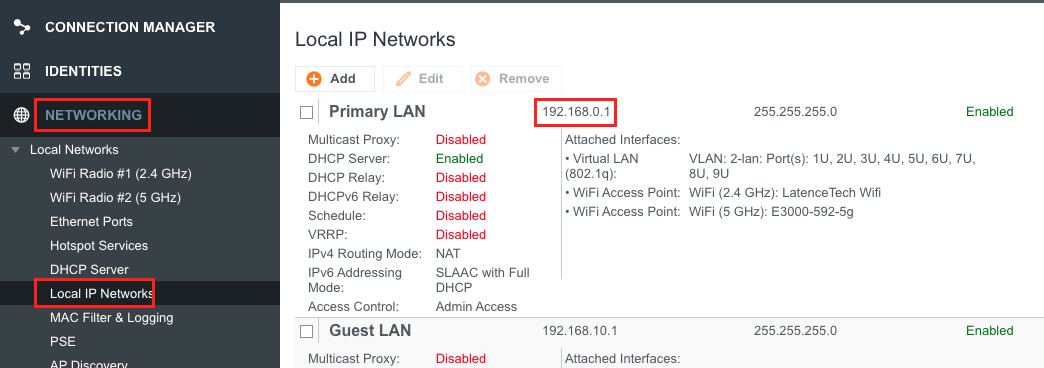
- Leave this page and click SYSTEM in the Edit Configuration window.
Configuring Reflector Container
- Click Containers then Projects.
- Click Add to open the Project Configuration window, and enter a name for the project.
- Click the Enabled checkbox.
- Go into the "Compose" tab.
- You can now paste this slightly modified version of the YAML config file from the docs and modify it with your License and reflector ID:
version: '2.4'
services:
  reflector:
    image: registry.latence.ca/software/reflector:latest
    container_name: lti_reflector
    ports:
      - "12023:12023"
      - "12024:12024/udp"
      - "12080:12080"
      - "12443:12443"
      - "12501:12501/tcp"
      - "12501:12501/udp"
      - "12800:12819/udp"
      - "12862:12862"
    restart: unless-stopped
    logging:
      driver: json-file
    environment:
      - LTI_reflector_id=REPLACE_BY_DESIRED_ID
      - LTI_license_key=REPLACE_BY_LICENSE_KEY
- Do not close this window and got to the Compose Builder tab.

- In the Networks section, click Add and select the Primary LAN and click Save.
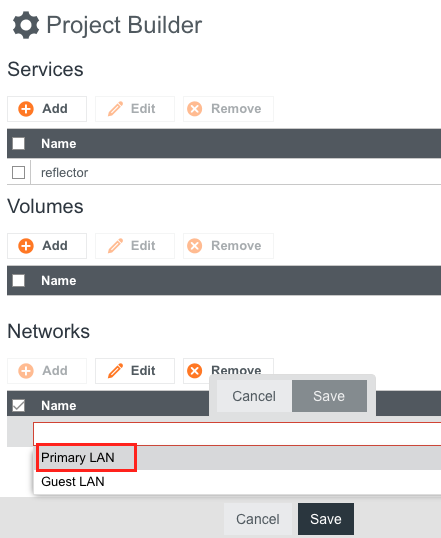
- Then, select reflector in the Services section and click edit.
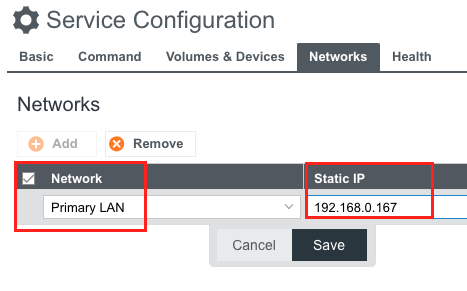
- Go into the Networks tab.
- Add the Primary LAN network and establish a static IP address for the container.
- Take note of the IP address you assigned to the container.
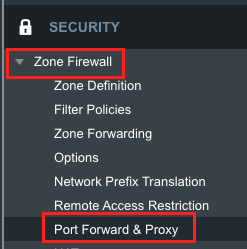
Configuring Zone Firewall
- You can now save all of this and go to the Security Tab on the left Panel.
- Select the Port Forward & Proxy in the Zone Firewall Section.
- We will now have to establish rules for each port that is necessary to the reflector as shown in the documentation.

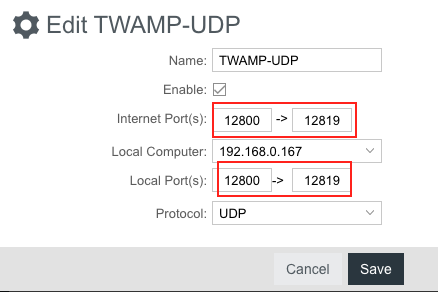
- In the Port Forwarding Rules section we can Add a rule for the HTTP port doing as such: 1) Name our rule appropriately, 2) Click on Enable 3) Establish the correct ports 4) Assign it to the IP address of our container 5) choosing the right Protocol

- We will have to do this for all the ports necessary.
- For the TWAMP section that requires ports 12800 to 12819 opened, we can follow this method:
- Once all the ports have been set, you should see all of them listed.
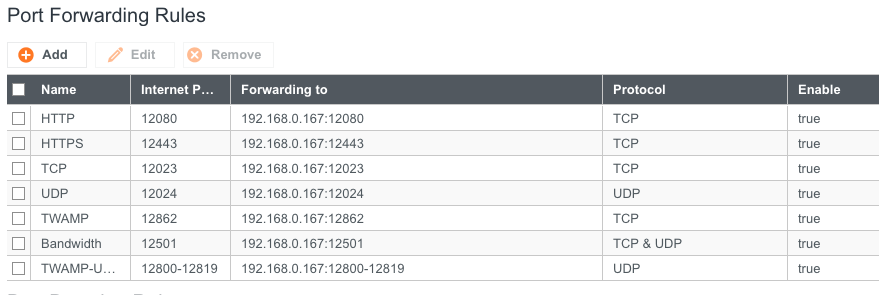
- We can now click Commit Changes and OK.
Verifying the Reflector is deployed
Complete the following steps to verify that the reflector container has downloaded and is up and running.
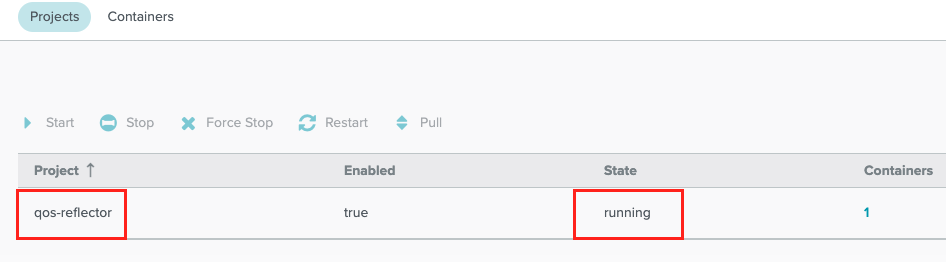
- Click on the device where you installed the docker.
- Click the Containers tab.

- Check that the container state is "running" under Projects.
- If the container doesn't show the running state, give it a few seconds and refresh the page.
- Sometimes it may take a few minutes for the router to actualize.
- In order for the Agent to send data to this reflector, you will have put the Static IP of the container that you establish earlier, in the QoS-agent configuration file.
- In this demonstration's case, we would write 192.168.0.167 in the reflector IP section.

- To confirm that the reflector works well, login to your dashboard, select your agent and verify that data is coming in.
- If some protocols don't show up, double-check your Port Forwarding Rules section.
Using a SIM card instead of the Local Network
Indications
There are 2 ways of managing your Cradlepoint modem: - The Remote NetCloud Manager, via https://www.cradlepointecm.com/, - The Local NetCloud Manager
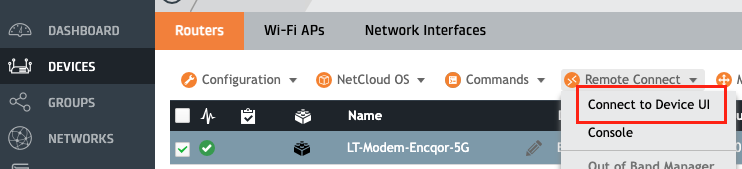
To access the Local NetCloud Manager you can: - Connect to your modem via ethernet, or to your modem network and then go to http://192.168.0.1. - Go to the Devices section on the Remote NetCloud Manager, select your device, click on Remote connect and Connect to Device UI.
Steps to Configure the Modem
We will follow these steps in the Remote NetCloud Manager.
The cradlepoint E3000 can only use one SIM card at a time. To use that card we will need to change some configurations in our modem: - Create a profile for the card - Change the order of priority of the Interface Profiles to put our SIM card profile first - Activate only the SIM slot used by our card - Switch to the Local NetCloud Manager and change the order of priority there too.
Create a profile
- Go to the Devices section.
- Select your device.
- Select Configuration and Edit.

- Click Add.
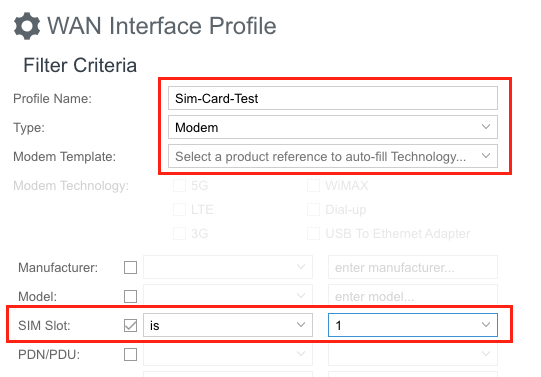
- Establish a name and select Modem type.
- Select the SIM card slot of your card and click on Next.
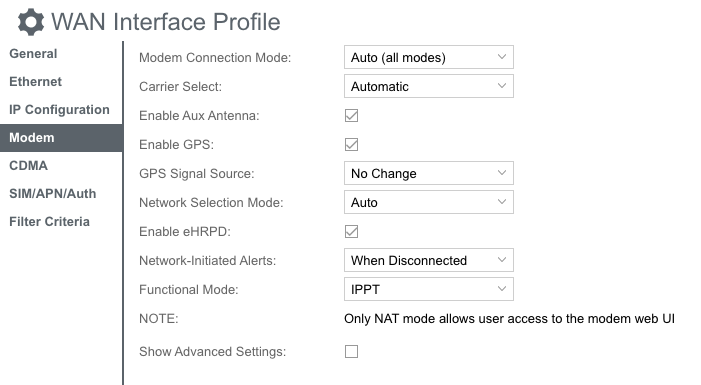
- In the Modem tab, make the necessary changes, if your carrier isn't in the drop down menu, simply select Automatic.
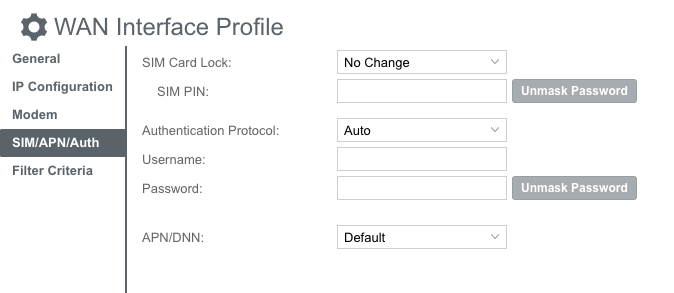
- In the SIM/APN/Auth tab, make the necessary changes, if you weren't provided a PIN or a specific APN, leave the default configurations.
- In the Filter Criteria tab, you can select different Modem Technology to help you classify the profile later.
- Click Save.
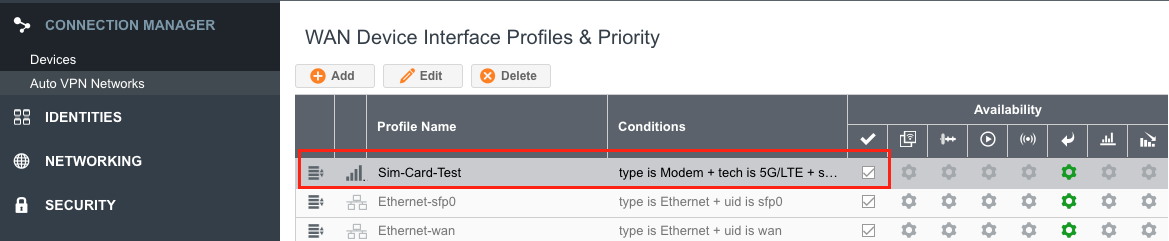
Order of Priority
- Now that our Interface profile has been created we have to move it to the top of the list and make sure the profile is activated
SIM Card Slot
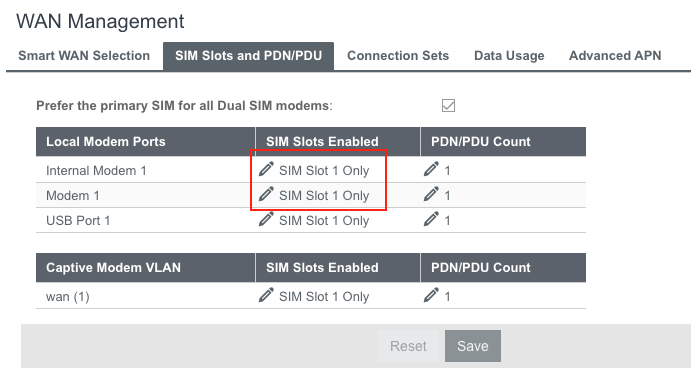
- Down the page, in the WAN Management section and SIM Slots tab, we can make sure that only the slot our card uses will be turned on.
- We can now hit Save and Commit.
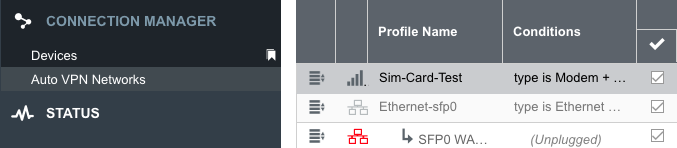
Local NetCloud Manager
Some changes might have trouble taking place when done from the remote NetCloud Manager, therefore to make sure our new profile is set, we will access the Local NetCloud Manager and change the order of priority there too.
As a reminder you can access the Local NetCloud Manager by:
- Connecting to your modem via ethernet, or to your modem network and then go to http://192.168.0.1.
- Going to the Devices section on the Remote NetCloud Manager, select your device, click on Remote connect and Connect to Device UI.
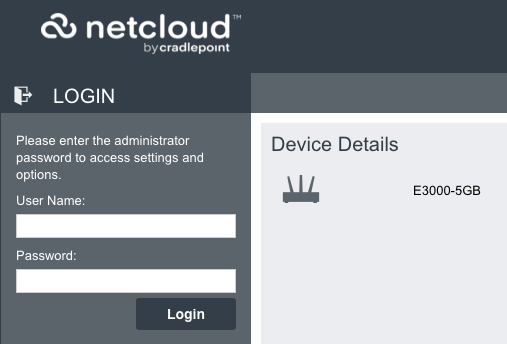
- Once on the Device UI, enter your credentials and log in.
- The default username is admin and default password is the password written directly under your modem.
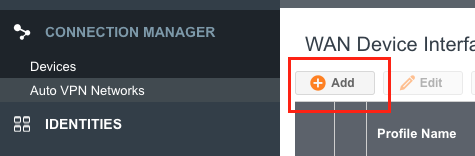
- Once connected, click on Connection Manager and select Devices.
- Make sure that you profile is at the top of the list and is activated.
- Changes might take a few minutes to fully take place
Support
For additional support, create a ticket by clicking on the "Ask for support button".