Outscale Deployment
LatencyTech offers a pre-configured Outscale Machine Image (OMI) on the Outscale Marketplace, streamlining setup. The generic LatencyTech OMI comes with 1x QoS Agent and Dashboard Analyzer, where the QoS Agent is pre-set to use a default public reflector (France). You also have the flexibility to add more QoS Agents as needed.
Use the following instructions for a deployment in production or for a trial.
Pre-requisites
- Having an Outscale account with permissions to create and administer Outscale VMs and security groups.
- Log into your Outscale Cockpit Account.
Security Groups
In order for our dashboard Analyzer to be able to receive data (from QoS Agent) and for you to connect (SSH) to the VM, we need to create a configure a security group.
Create the security group
- Click on the Security Groups tab in the Compute section.
- Top right, click on the Create Security Group button.
- You can name it "analyzer ports".
- Set the decription you want.
- Click on create.
Configure the security group
Once you're back on the page, Click on the eye icon next to the group name.

- Use the drop menu on the left called "Custom" to first select the SSH port and define the source IP you want.
- You will then click on the Add Rule button to add some more.
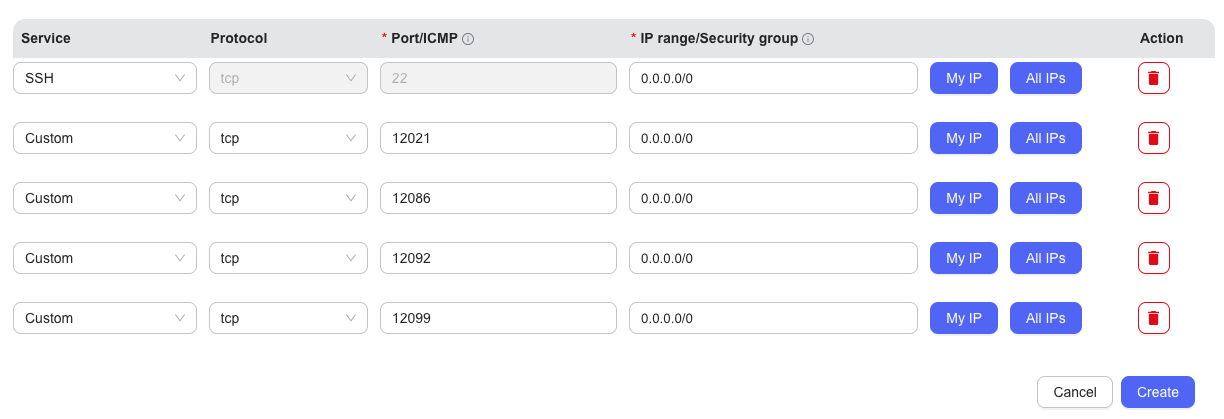
- You will need to add a rule for each of those ports: 12021, 12086, 12092 and 12099 all set to All IPs.
- Click on create.
You should see a configuration similar to this:
Create the Analyzer
Once our security group is ready we can go and create our VM.
- In the Compute section of the sidebar, click on VMs.
- Click on the top right button Create VMs.
General information
- Set the name of your VM.
- Leave the "VM tenancy" to Default.
Image
- In the search bar, type in Latencetech.
- Select this image: Latence_Analyzer_1.1_OMI.
VM Type
- For the CPU generation you can choose GEN 6.
- You can set the performance to Medium.
- You will need 2 cores for the Analyzer.
- And 4GB of RAM for a small deployment, you can go up to 8GB if you will be deploying more than 50 QoS Agents.
- You can leave the number of VMs to 1.
Net
- You can leave the default values here unless you have some network requirements to fulfill.
Root Volume
- You will need to select Customize root volume.
- You can leave the volume name and type with default values.
- But you will need to set the volume size to a minimum of 20GB.
Security Group
- Here we click on Select one or more existing security groups.
- And we will select the group we previously created.
Keypair
- If you don't already have a ssh key ready, click on Create a new keypair and download it. If you clicked and downloaded the ssh then this key should be used to connect with VM using ssh.
User Data / Cloud-init
- For our deployment we do not need any custom data, you can just click on "Next".
Summary
- You can finially click on Create VMs
Connect to our Analyzer
Now that Latencetech Dashboard Analyzer is created, you can wait 10-15 minutes for it to setup your VM.
Once the VM is up and running, you can connect to it remotely by using the Outscale user with the command below:
ssh outscale@<public IP> -i <your generated key>
Login details can be found at the end of lti_analyzer.launch.log file inside /home/outscale/latence directory.
You can use below command to view the contents of the file.
cat lti_analyzer.launch.log
You can view and access the dashboard at:
http://<public IP>:12021
After login into your Analyzer dashboard, you will be able to see data from the Generic Agent you setup.
Adding additional QoSAgents and Reflectors
To add additional QoSAgents, follow the guidelines in the Prerequisites and assumptions and Launching the system sections of our documentation. When configuring your new QoSAgents, use your new Analyzer IP address as the destination (field msgbus.latence.ca) for the results.
Similarly, you can create your own reflectors following the guidelines in the Prerequisites and assumptions and Launching the system sections. You can also temporarily use the LatenceTech public Reflectors described below. Use this value in the LTI_reflector field of the QoSAgent configuration:
- Paris, France: paris-beacon.latence.ca
- USA: northcentral-beacon.latence.ca
- Montreal, Canada: montreal-beacon.latence.ca
- Brazil: beazil-beacon.latence.ca
LatenceTech public Reflectors are provided ‘as is’ and without any warranties, express or implied.
Outscale Dynamic IPs
Outscale VMs are assigned dynamic public IPs by default, which change upon every restart. To ensure reliable communication with custom ‘Agents’ which depend on the Analyzer’s IP for data transmission, we recommend assigning a dedicated public IP to the Analyzer to prevent potential connectivity issues.
Further Considerations
It's recommended to check Further Considerations section for info on Creating Backups, Add TLS/SSL Certificates , and more. If you need to make changes to the dasboard view and adapt it your preference, please contact us at support@latencetech.com.