Smart SFP Deployment (Beta)
Early Adopter Program The Intelligent SFP 1G Pro is currently in Beta. The hardware and software specifications described below are subject to change. Please report any stability issues or unexpected behavior to the support team.
Overview
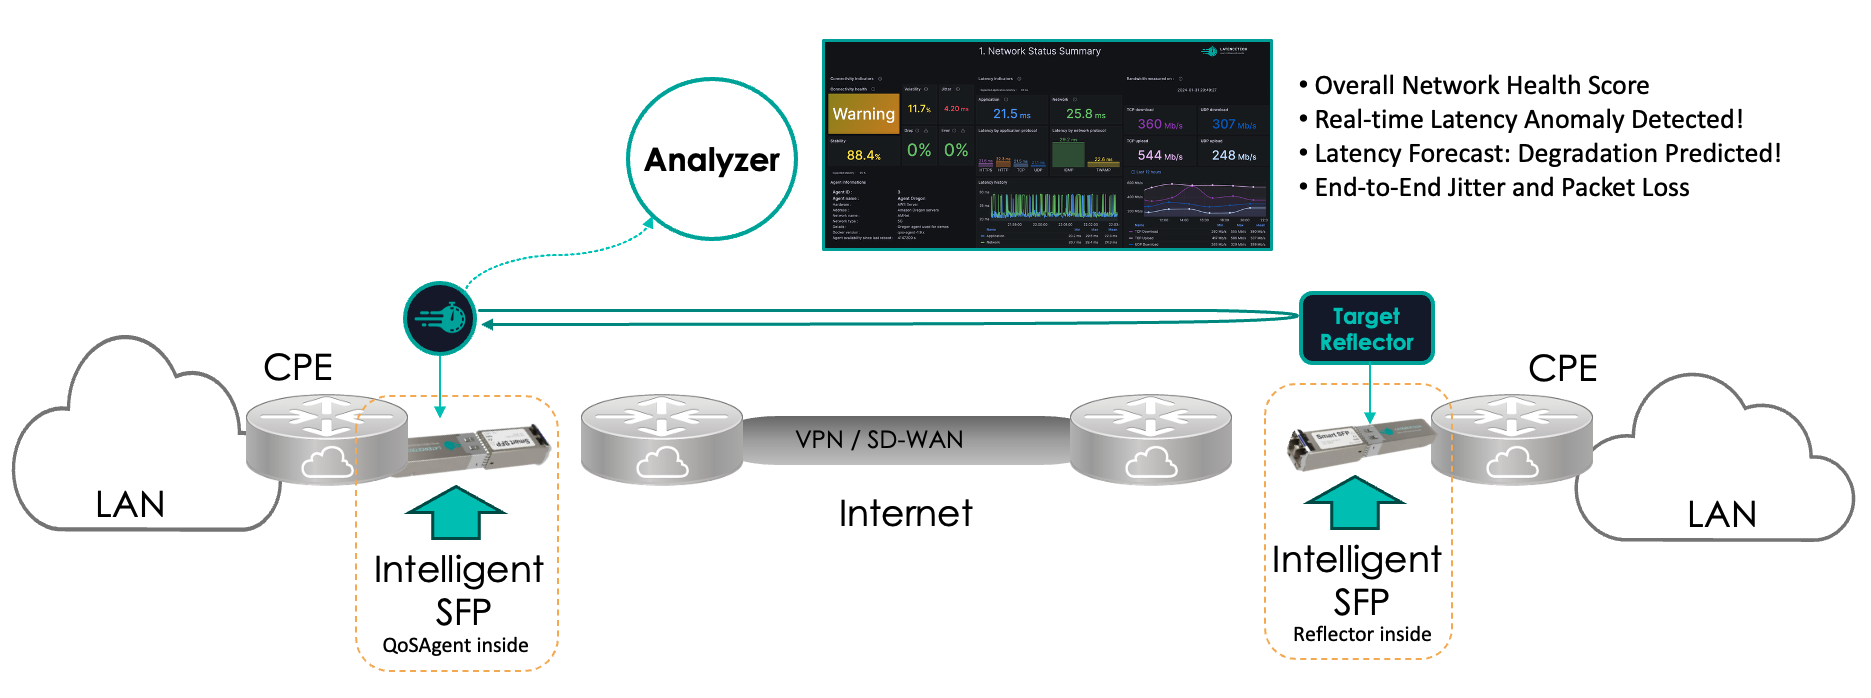
The Intelligent SFP 1G Pro is a preconfigured Small Form-factor Pluggable (SFP) module that functions as a complete Linux server. It is designed to host a component of the LatenceTech solution—either a QoSAgent or a Reflector—directly within your network infrastructure without requiring external hardware.
Typical Deployment
Prerequisites
Before installing the device, ensure your environment meets the following strict hardware and network requirements.
Hardware Requirements
- Port Type: The host port must be a 10G SFP+ port.
- Note: While the module operates at 1G network speeds, the power requirements of the computing core necessitate an SFP+ slot to ensure sufficient power delivery.
- Cooling & Spacing: The host device must have active cooling. To effectively dissipate heat, each Intelligent SFP 1G Pro must be separated by either an empty slot or a standard optical transceiver. Do not install two Intelligent SFPs side-by-side.
- Compatibility: The host network device (Switch/Router) must be configured to accept third-party modules (i.e., ensure "vendor lock" is disabled). Refer to your switch or equipment vendor for specifications on compatible SFP devices.
Network Requirements
- Management Access: TCP Port 22 (SSH) must be open to allow management of the SFP.
- LatenceTech Connectivity: The SFP requires the standard connectivity rules to communicate with the LatenceTech Analyzer. Please refer to the General Prerequisites page.
Environmental Limits
| Parameter | Range |
|---|---|
| Operating Temperature | -25 °C to +85 °C |
| Relative Humidity | 20% to 85% (non-condensing) |
Installation & Startup
- Insert the Module: Plug the Intelligent SFP into a compatible SFP+ port on your switch or router.
- Boot Sequence: The device will boot automatically upon insertion.
- Wait time: The system requires approximately 60 seconds to fully initialize.
- Status Indicator: Wait for the LED indicator on the SFP to turn Green. This indicates a successful boot and that services are running.
Configuration
Once the device is booted (Green LED), you can access the onboard Linux OS via SSH to configure the LatenceTech software.
1. Identify the IP Address
The device comes configured to obtain an IP address via DHCP by default. To find the assigned IP:
* Check your DHCP server's lease table.
* Alternatively, scan your local subnet for port 22:
bash
    nmap <network_address>/<network_mask> -p 22 --open
2. Connect via SSH
Connect to the module using the credentials provided in your Trial Kit.
ssh user@<device_ip_address>
Security Note: It is highly recommended that you change the default password immediately after the first login using the
passwdcommand.
3. Initial Setup Commands
After logging in, switch to the superuser and run the specific maintenance commands to prepare the environment:
# Remount the filesystem (if necessary for specific write operations)
mount -o remount,ro /

# Clear package cache to free up storage space
apt clean
4. Deploy the Agent or Reflector
The home directory (/home/user/) contains default configuration templates for the LatenceTech containers.
- Edit Configuration: Use
viornanoto edit the configuration file (e.g.,lti_qos-agent.yml) to match your Analyzer credentials and preferences.- Reference: See the Configuration Guide for details on YAML parameters.
- Start the Service: Launch the container using Docker Compose:
bash
    docker compose -f lti_qos-agent.yml up -d
Resource Limitation The module is designed to run one active container at a time (either 1 QoS Agent OR 1 Reflector). Running multiple containers simultaneously may cause thermal instability or performance degradation.
Network connectivity
The device has 2 network interfaces : gbe0 for the fiber side and gbe1 for the electrical side. Based on your requirements, the interfaces can be preconfigured according to your needs. You can also configure these interfaces yourself to use either the dhcp protocol or a static address by modify the /etc/network/interfaces.d/gbe file.
DHCP
To configure a network interface to use DHCP, start by executing these commands.
mount -o rw,remount /
nano /etc/network/interfaces.d/gbe
Then, modify the block configuring the desired interface. For example, you can use these lines.
auto gbe1
allow-hotplug gbe1
iface gbe1 inet dhcp
hwaddress ether <let the mac address here>
Finally, restart the device.
/sbin/reboot
If you use this network configuration, and you later want to access the device for management of configuration, you will need to find the IP address of the device. For example, you can check the management interface of your DHCP server or use nmap.
Static address
To configure a network interface to use a static address, start by executing these commands.
mount -o rw,remount /
nano /etc/network/interfaces.d/gbe
Modify the block configuring the desired interface. For example, you can use these lines.
auto gbe1
allow-hotplug gbe1
iface gbe1 inet static
hwaddress ether <let the mac address here>
    address <static IP address here>
Finally, restart the device.
/sbin/reboot
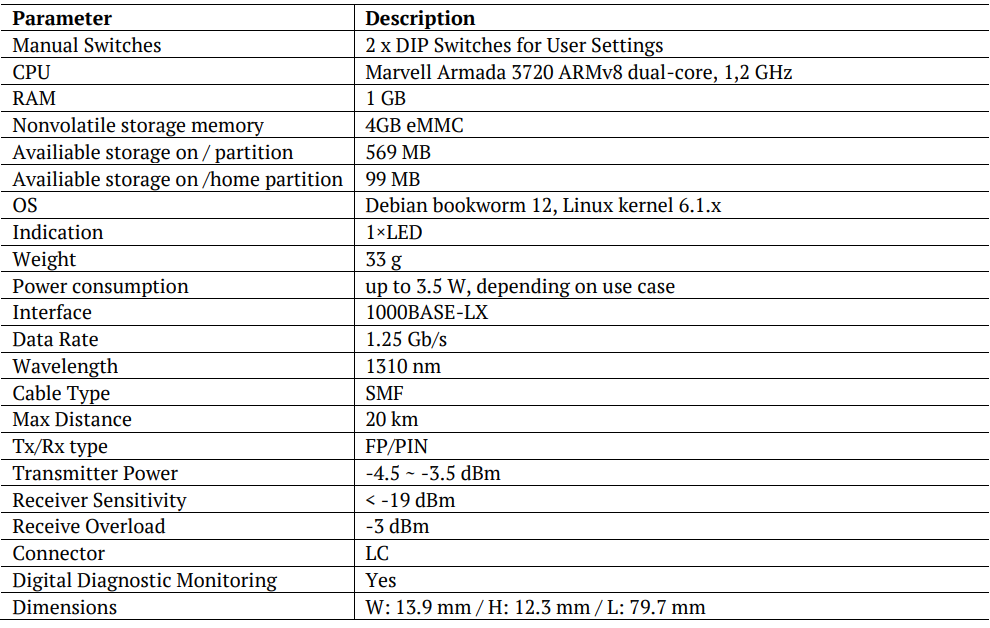
Technical Specifications for Intelligent SFP 1G Pro device
Troubleshooting
- LED remains Red: The boot process failed. Remove the module, wait 10 seconds, and re-insert it. If the issue persists, ensure the port is SFP+ and provides sufficient power.
- Cannot Connect via SSH: Ensure your switch is not blocking SSH traffic on that specific interface and that an IP has been allocated via DHCP.
- Stability Issues: Verify that the "Spacing" rule is followed (no adjacent hot modules) and that the ambient temperature is within the specified range.